Project Nursery: Soleil and the Elis
I'm about to give birth but it's still taking me forever to complete this project. If i had my way, this would have been done weeks before but thanks to hubby's 'busy sched' (:D:D:D) we're still finishing up.
Ok, so im inlove with the yellow+gray combo, one other thing im so loving right now is the CHEVRON PRINT! It's just so adorable and can be used as background for anything. So i used it for Soleil's corner nursery and added some colors to make it more lively.
Materials:
1. Canvas prints. (But since canvas printing is way too expensive, i just printed mine on tarpaulin. Just use the 'wrong side' or the side which isn't glossy for a canvas-like finish)


2. Scrap wood/molding
3. Gun tacker
4. Paint/brush
Procedure:
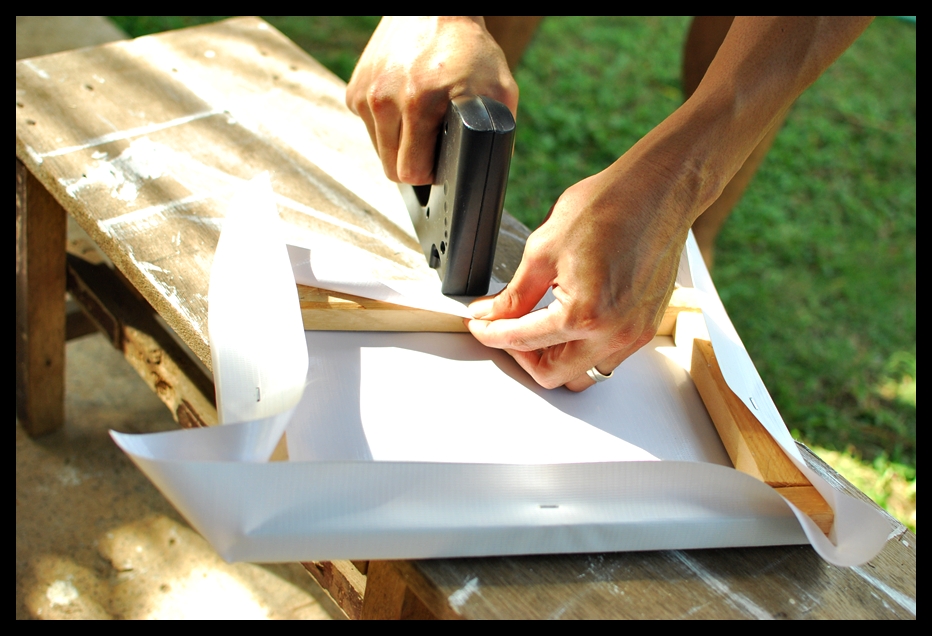
1. Make frames from scrap wood or use thin moldings available at any hardware store.

2. For the 'soleil' art, paint frame with desired color. (i used white)

3. Let it dry.
4. Gun tack print around the frame.

5. Viola!


*************************************************************************
DIY Wall Art: Love
For the second installment to my EAT, PRAY, LOVE wall art series (hah!), i found this unused picture frame which was given as gift just lying around the house. It was a bit small for the LOVE i had in mind but i used it anyway instead of buying something new.
LOVE
Materials:
Picture frame
Paint ( I used yellow and white)
LOVE cutouts
Instructions:
1. Paint the frame and the board white (or your desired color)
 2. Let them dry then arranged letter cutouts on the board.

3. Using small brush, paint the edges of the letter cutouts moving outwards.

4. Let paint dry then remove letter cutouts. Using back of brush, blot dots on the letters for polka dots effect.

5. Let dry completely then reattach board to frame. Viola!


DIY Wall Art: Pray
Project Nursery: Soleil and the Elis
I'm about to give birth but it's still taking me forever to complete this project. If i had my way, this would have been done weeks before but thanks to hubby's 'busy sched' (:D:D:D) we're still finishing up.
Ok, so im inlove with the yellow+gray combo, one other thing im so loving right now is the CHEVRON PRINT! It's just so adorable and can be used as background for anything. So i used it for Soleil's corner nursery and added some colors to make it more lively.
Materials:
1. Canvas prints. (But since canvas printing is way too expensive, i just printed mine on tarpaulin. Just use the 'wrong side' or the side which isn't glossy for a canvas-like finish)
2. Scrap wood/molding
3. Gun tacker
4. Paint/brush
Procedure:
1. Make frames from scrap wood or use thin moldings available at any hardware store.
2. For the 'soleil' art, paint frame with desired color. (i used white)
3. Let it dry.
4. Gun tack print around the frame.
5. Viola!
Ok, so im inlove with the yellow+gray combo, one other thing im so loving right now is the CHEVRON PRINT! It's just so adorable and can be used as background for anything. So i used it for Soleil's corner nursery and added some colors to make it more lively.
Materials:
1. Canvas prints. (But since canvas printing is way too expensive, i just printed mine on tarpaulin. Just use the 'wrong side' or the side which isn't glossy for a canvas-like finish)


2. Scrap wood/molding
3. Gun tacker
4. Paint/brush
Procedure:
1. Make frames from scrap wood or use thin moldings available at any hardware store.

2. For the 'soleil' art, paint frame with desired color. (i used white)

3. Let it dry.
4. Gun tack print around the frame.
5. Viola!


*************************************************************************
DIY Wall Art: Love
For the second installment to my EAT, PRAY, LOVE wall art series (hah!), i found this unused picture frame which was given as gift just lying around the house. It was a bit small for the LOVE i had in mind but i used it anyway instead of buying something new.
LOVE
DIY Wall Art: Pray
LOVE
Materials:
Picture frame
Paint ( I used yellow and white)
LOVE cutouts
Instructions:
1. Paint the frame and the board white (or your desired color)

2. Let them dry then arranged letter cutouts on the board.

3. Using small brush, paint the edges of the letter cutouts moving outwards.

4. Let paint dry then remove letter cutouts. Using back of brush, blot dots on the letters for polka dots effect.

5. Let dry completely then reattach board to frame. Viola!


PRAY
Materials:
Wood Planks
White Paint
Old Box
Yarns
Mounting Tape
Instructions:
1. Arrange 3 planks (25x4 inches) with an inch space in between. Put them together by using two support planks at the back.
 |
| My Lil Handy Gab 'checking' the board♥ |
2. Paint with white or whatever color you desire.

3. Let dry.
4. Cut letters from old box or cardboard

5. Yarn around with desired color. ( i used yellow since im so inlove with the color!)

6. Using mounting tape, stick letters to wood and... voila!

Here it is :)

DIY Wall Art: Sunshine
I was thinking/browsing of a way to make our home more colorful and lively without having to spend a fortune (since i don't really have that right now :D :D :D). The it came to me, 'of course, Wall Art! Do-It-Yourself Wall Art!'
Starting with the dining area, i found an inspiration from Pinterest (ilove!) which really looked easy to do. Here's how :)
Materials:
Canvas - bought it from Kamuning market for P100/yard (only used around half yard)
Wood Frame - recycled ours from the previous wall decor
Gun Tacker
Fabric Paint - (i used 2 colors: orange and yellow)
Paint Brush
Painter's Tape
Instructions:
1. Fix wood frame with the desired dimensions. Mine is 50x30 inches.

2. Cut canvas basing on frame dimensions with extra 2inches on all four sides for allowance (or depending on the thickness of your frame)

3. Gun tack canvas around the frame, making sure it is well stretched to avoid wrinkling.

4. Layout design using painter's tape.

5. Paint away!
 |
| i got some help from my Lil Artist♥ |
6. Let paint dry and... voila! easy-breezy wall art. I call it SUNSHINE :)

Here it is hanging on our wall.

Project Nursery: Pompoms!
Materials:
Crepe paper ( I used white and different shades of yellow)
Styro balls (Size depends on how big you like your pompoms to be)
Scissors
Glue
Ribbons and hooks
Procedure:
- Cut crepe paper circles, about 3 in. in diameter
- Fold circle into four pressing just the tip of the cone so it's still 'fluffy'
- Starting from the bottom, use glue to stick to styroball
- Stick cones around styoball until the other end BUT leave enough space for the hook and ribbon

For variety, i made a different one just by folding and rolling strips of crepe paper and sticking them to the styroball.

Project Nursery: Crib Beddings
Fitted Sheet
Comforter
Small Pillow Case
Bolster Case
Materials:
- Approximately 5 yards x 45 inches cotton cloth (2 colors for accent)
*Bought the cloth in Kamuning market for P60/yard
- Comforter fill
- Sewing machine
- Sewing supplies

Procedure:
1. Get the crib mattress dimensions. (Or just measure old crib beddings)
2. Cut cloth.
3. Sew away.
(helpful, huh? :D)
Finished product measurements:
Fitted sheet = 43 x 23 x 5 in
Comforter = 43 x 23 in. plus 1 in. piping
Bolster cases = 17 x 6 in. plus 2 in. end accents
Small pillow case = 12 x 8 in. plus 1 in. piping
** Just add 1-2 in. to these measurements as allowance before sewing.

Walang komento:
Mag-post ng isang Komento